

As an avid user of FreeCommander, and an occasional PortableApps.com User, I present this tutorial that the suggestions and guidance herein might benefit other users.
This resource is written with the Microsoft Windows User in mind. Some of the procedures described here require administration of the System’s Advanced settings† (according to Windows nomenclature).
What follows is a mere outline; a model for expanding upon the universal, portability of USB software, as distributed by PortableApps.com (i.e. the .PAF.exe format). I suspect this model should not be limited to the PAF USB software Operating System, that it might include U3 and several other USB portable software management platforms.
Prerequisite:
- FreeCommander.exe
- PortableApps.com Suite (or other USB portable software Operating System)
- USB media as required by the Portable Software O/S (i.e. the reader has a flash drive, on which he or she maintains portable software)
Acquisition and Configuration of Required Software
It’s reasonable to assume the reader is already outfitted with his or her preferred Portable Applications, USB software operating system. If the reader has yet to experiment with Portable Software, I recommend he or she investigate the various options available. The general interest for portable software is likely on the waning side, as it enjoyed greatest popularity nearer the advent of large capacity USB devices (i.e. USB memory capacity exceeding 500MB – 1GB), and the initial release of PortableApps.com and the SanDisk affiliated, U3™ system, factory installed on SanDisk devices.
FreeCommander is a dual-pane file manager (i.e. midnight commander), in the spirit of so many 3rd-party file-managers, meant as a supplement or replacement to the System file manager, Windows Explorer. FreeCommander.exe is available at no cost, from www.freecommander.com. Use fc_setup.exe to install FreeCommander.exe under Program Files (i.e. typical, default settings), and examine the FreeCommander configuration, under Settings > Start Program > Start Folder, “Start with the following folder…”.
FreeCommander understands System and User Environment Variables. Therefore, it is capable of intelligent operations, such that– as illustrated in this tutorial– setting a few special configuration options will greatly increase productivity, afford ease of use, and enhance the portable experience of USB software systems, like the PortableApps.com PAF platform.
FreeCommander as Enhancement to PortableApps.com
A recommended configuration for rapid Identification of current drive letters
Configure This:
Depending upon the system running “PortableApps.exe”, certain Environment
conditions will change. In order to best maintain consistency across
different platforms, setup a benign, “global” configuration “helper”, at each
first run of PortableApps.exe. This “helper” will be System Environment var
%PORTABLEAPPS% = [pafDrive:]PortableApps
such that [pafDrive:] is equal to the drive letter of the USB device
and “[pafDrive:]PortableApps” will therefore equal the CURRENT folder of
all previously configured Application.paf.exe software (i.e. “your apps”)
Because FreeCommander Told You
Using FreeCommander’s pre-defined startup folders (Settings -> MenuItem#2),
set one of the 2 available folder values to %PORTABLEAPPS%.
If the Environment Variable is NOT currently set on that Operating System
then the folder path will fail, on PORTABLE Freecommander.exe launch.
If the %PORTABLEAPPS% Env is ‘NULL’, then immediately create the value,
ensuring that it points to [currentDrive:], where the .paf.exe installed
apps reside, as will be determined based on existing system drive letters.
A Guide To The Portable Friendly Environment
PortableApps.com Format
The purpose of this file is to instruct the PortableApps.com User in one
possible solution to an efficient PortableApps.com WITH FREECOMMANDER setup.
NOTE:
THE FOLLOWING IS NEITHER REQUIRED, NOR SUPPORTED BY PORTABLEAPPS.COM!
Follow these instructions, AT YOUR OWN RISK, to prepare an MS Windows®
system for high performance file management using FreeCommander Portable with
the PortableApps.com platform. The instructions assume the User has already
installed a functional PortableApps.com suite on his or her portable storage
(or SECURE networked storage) device.
“But, I Don’t Use the PortableApps Suite!”
I reference the PortableApps.com “PAF” format here, but I extend the information to users of any Portable Software system. If the reader uses U3, MyPendrive, StartUSB, or any of the numerous alternatives to launch Portable Software from a USB memory device, then just imagine your software title in place of PAF, or PortableApps Suite, whenever the specific title is referenced, below. When it comes to symbol naming, instead of PAFDRIVE, perhaps it is more sensible in your situation to name it U3DRIVE, or– maybe— it would make most sense if I change the tutorial to read USBDRIVE, USBAPPS, USBDOCS, etc., instead of referencing a specific title. Okay. I’ll make that change, as soon as it surfaces on the priorities list.
PART ONE: Prepare For Modifying System Environment Variables
This portion of the tutorial is meant to ensure the Reader understands the concept of the System Environment (in the context of Environment Variables). I authored this section, specifically, with concern that the result would be as a step-by-step walk-through. The reader is directed in a somewhat slow-paced, decidedly user-friendly manner, to access the Windows® System Properties options, delicately.
If the Reader / User is familiar with System Environment Variables (aka. Env Vars), he or she may wish to skim this section, in favor of moving beyond the explanation, to get to the specifics of the target configuration.
Instructions: Part 1
Note, as this section moves from one pointe to another, the text is further indented. This structured layout means to aid the reader in retracing the text, as needed.
If the text is not indented, it is probably due to an HTML styling issue. I apologize for this text, as a public tutorial, is indeed in a first draft state.
Using the mouse, perform the following actions to open “System Properties”:
Click “Start”
The Start menu opens, showing a variety of clickable items, including
the “All Programs” menu, and any items which may be “pinned” to the
Start menu, such as the default web browser, e-mail client, “My Documents”
etc.
With the start menu visible (from previous step)
Right-click “My Computer”
an interactive “context menu” opens.
This is the “My Computer context-menu”
With the “My Computer context-menu” open
Click “Properties”, a menu item usually appearing near the
bottom of the context-menu.
The “System Properties” window should now be open. Using the mouse,
perform the following actions to access the “Environment Variables”.
System Properties
System Properties (i.e. M
y Computer, Properties):
The “System Properties” window contains multiple sub-windows, each with a
unique set of more specific options. The sub-windows may not seem obvious
at first: note the various tabs lining the upper part of the window.
Tab Options:
In “tabbed” option windows, like “System Properties”, depending
upon which tab is “in focus”, different sets of options
will be accessible, allowing this small window to house many
configuration options by offering many sub-windows in one.
Windows® is able to organize many different options within one
window, by breaking-up various sections into “tabs”.
Advanced Tab:
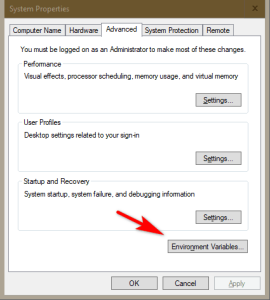
Click the “Advanced” tab. The “Advanced” options become visible,
or in technical terms, the Advanced options become “in focus”.
With the “Advanced” System Properties tab in focus, the
Environment Variables are just one more click away. Locate, and
CLICK the button labled “Environment Variables”.
Environment Variables:
A new “sub-window” opens, separate from the System Properties
window, showing two primary sections for Environment Variables:
System Variables:
“User Variables” and “System Variables”, each with a set of
buttons to add, modify, or remove “Environment Variables”.
Under “System Variables”, click “New”
A “New System Variable” input area opens.
The “New System Variable” takes two strings of information:
VARIABLE NAME, and VARIABLE VALUE.
Attention:
This section assumes the PAF (PortableApps.com Format) user has read
the previous section, “Prepare For Modifying System Environment Variables”.
It is essential that the user follow the step-by-step instructions for
opening the “New System Variable” input, BEFORE proceeding with further
instructions, below.
Instructions: Part 2
System Environment Variables
The “New System Variable” input allows for creation of custom Environment
Variables, as described at the very beginning of this RECOMMENDATION. Listed
below are “Variable Name”, “Variable Value” sets. Enter each into the
appropriate area of the “New System Variable” input box, clicking “OK” for
each finished set. After “OK”, the “New System Variable” input closes, adding
the user data to the existing “System variables”.
Repeat this process, until each of the items in the list below have been added.
Remember, click “New” to invoke the “New System Variable” input box!
The Portable Friendly Environment
IMPORTANT:
Identify the drive letter associated with the device where your
“PortableApps.com” system is currently installed. Open “My Computer” to view
the drive letters currently available to your system. If your PAF installation
resides on a USB memory device, it might be appear in “My Computers” as having
the properties, FOR EXAMPLE, under heading “Devices with Removable Storage”, as
[ PortableApps.com (E:) ], without the square braces of course.
Example:
Note: It is important that the PAF drive is connected to the system at this time.
Windows® generally indicates the location of memory stick, or USB drive media separate from the system drive and fixed-disks. If the reader is uncertain of the location of the PAF media, the following examples should offer some insight.:
by disc label: [ SanDisk Cruzer (E:) ]
by generic media type: [ Removable Media (F:) ]
by generic media type: [ USB Mass Storage Device (G:) ]
and so on…
You will NOT be able to complete this section, unless you have identified
the PortableApps.com drive letter, as it is part of the data which must be
entered into the following “System Variables”. For the sake of universal
reference, and in an attempt to avoid confusion with drive letters, the
“Variable Values” listed below do not contain real examples. Instead, where
you will enter YOUR DRIVE LETTER, the text below reads “[ drive: ]”. When
entering your values, simply replace [drive:], FOR EXAMPLE, with E: or F: ,
using no square braces, entering the complete path (which can been copied
from Windows® Explorer address bar, if you navigate to that drive path).
Hint:
Using Windows® Explorer (start -> run: explore.exe), browse to “My Computer”,
locate and open the drive containing the “PortableApps.com” suite installation.
Open the PortableApps.com drive folder, “Documents”, and create a new folder.
Named the new folder “Application Data”, so the resulting path is as follows:
[PAF_Drive:DocumentsApplication Data]
After naming the new folder, proceed to “New System Variables List”, below.
The New System Variables List
In the “Environment Variables” window, pay attention to whether you are
adding new Variables to “User variables for [username]”, or “System Variables”
The following Variable Names and Values are applied to the System Properties
and Environment Variables window, as described in PART ONE. From the folder
we just named “Application Data”, use Windows® Explorer to locate the following
paths, as applicable to your own system (i.e. If your PAF drive letter is G:
then the value of the first Variable Name, “PORTABLEAPPS”,
would be: G:PortableApps)
Suggestion:
Since your system might recognize various hard drives, CD-ROM’s, DVD-ROM’s, etc
and, depending upon which hardware is attached to the system at any given time,
it’s possible your PortableApps.com memory-stick “drive” might show in Windows®
with a different drive-letter at different times. For example, installing a new
DVD-RW drive since the last time the PortableApps.com memory stick was used,
the DVD-RW drive might now occupy that Drive-Letter previously used by the
portableapps.com drive.
Purpose:
The whole point of setting Environment variables corresponding to
the PortableApps.com device is to establish CONSISTENT, most FAMILIAR
INTERACTION with PortableApps.com software, especially when the USB device
is regularly plugged into different PC’s, for continued access to the unique
collection of software which you rely upon.
Following this method for configuration of System Environment Variables,
perhaps the greatest benefit is the potential for optimized communication
between the USB device and the Operating System (i.e. Windows® 7, XP, WinE, etc).
Solution (suggested):
Assign a specific drive letter to the PortableApps.com drive.
Using keyboard shortcut for RUN, press the “Windows®” key (between Control and
Alt). While holding the “Windows®” key, press the “R” key. I.E. key-combo Win+R
(If the key-combo doesn’t work, just go START > Run, to bring up “Run”).
Enter the following into the RUN dialogue, and select ‘OK’:
compmgmt.msc
The MMC component, ‘Computer Management’ opens. Locate the “Storage” branch,
expand the “Storage” branch, and select / activate “Disk Management”.
Intelligent Paf Usb Drive Management
Six Intelligent Assignments
Environment Variables For Paf Device
The following six environment variable names are further described below:
- PAFDRIVE
- PAFROOT
- PORTABLEAPPS
- PAFDOCS
- PAFAPPDATA
- PAFCACHE
Variable / Value Pairs:
Add the following variable / value pairs under “system variables”:
NOTE: the values indicated here may not be compatible with your PC. These values are meant as a guide. Please be aware that values shown as
“[ drive: ]”, for example, are strictly NOT meant for use in practice, as it is merely a generic representation, or shorthand, to indicate “place any drive character here” (i.e. instead of “[ drive: ]”, an actual drive path must be used, as in “C:”, “A:”, or “P:”).
~~~~~ Click “new” to open the add variable dialogue ~~~~~
- Be careful not to include extra spaces or incorrect characters!
- Refer to the existing environment variables, for proper formatting syntax (i.e. Remember, the % character is not part of the variable name on assignemnt. The % is, however, used when the VALUE of the variable is desired. See a use case example, below, where the deprecated VARIABLE NAME, “PAFROOT” is assigned the VALUE of %PAFDRIVE%).
PAFDRIVE
Variable Name: PAFDRIVE
Variable Value: [ drive: ]
EXAMPLE: type PAFROOT into the “NAME” field
type G: into the “VALUE” field [ NO trailing slash! ]
PAFROOT
!!! PAFROOT IS DEPRECATED IN FAVOUR OF PAFDRIVE !!!
Based on the logic that it’s more definitive; more cross-platform compatible to use “DRIVE_name”, instead of “ROOT_name”, it is reasonable to eliminate the variable NAME PAFROOT. However, we take this opportunity to demonstrate how to handle such a situtation, in which an old variable-name is replaced by something new. Once you get used to Environment Variables, you might wish to employ this technique elsewhere in your System Environment Variables, to customize your environment to better fit your own preferences.
Even though we’ve decided to deprecate the variable name, it will be created anyway to ensure better coverage– but– only by assigning it the value of another environment variable.
Deprecation vs Deletion:
Using this method, the System will cross reference the alternate variable name to acquire the desire value, while any existing scripts which might contain reference to the deprecated variable name will continue to function properly.
Variable Name: PAFROOT (deprecated!)
Variable Value: %PAFDRIVE%
(E.G.
“PAFDRIVE == P:” AND “PAFROOT == %PAFDRIVE%”
THEREFORE “PAFROOT==P:”
)
PORTABLEAPPS
Variable Name: PORTABLEAPPS
Variable Value: %PAFDRIVE%PortableApps
( e.g. G:PortableApps )
PAFDOCS
Variable Name: PAFDOCS
Variable Value: %PAFDRIVE%Documents
( e.g. G:Documents )
PAFAPPDATA
Variable Name: PAFAPPDATA
Variable Value: %PAFDRIVE%DocumentsApplication Data
( e.g. G:DocumentsApplication Data )
PAFCACHE
Considering it’s possible the reader might not be aware of the following shortcuts, let us create a directory on the System disk to use for storing PAF cache data. Whenever possible, it may improve PAF application performance if the %PAFCACHE% variable might be assigned under individual application preferences, as a custom path for cache files.
Identify, press, and hold the Windows®, or Start key, on the keyboard. With the Windows® key depressed, press the “R” key, for the combination keybinding of “Win+R”, to trigger the Windows® Run dialogue (if the Run dialogue does not appear, then use any known traditional method to open it).
Type “%COMSPEC%”, “cmd.exe”, or “cmd” into the Run window, then hit “Enter” on the keyboard, or click “OK” (the idea, here, being to limit the use of the mouse, administering commands from the keyboard only, as the forthcoming action takes place in a terminal [aka. command line] window).
From the command prompt, type (or copy directly from this text, then paste) the following on the command line, and execute the expression by hitting “Enter”:mkdir %HOMEDRIVE%pafCache
Since %HOMEDRIVE% is a built-in, or default Environment Variable created by the Operating System, it doesn’t matter whether we are aware of its actual value– just as it doesn’t matter to the System what are the values of the Environment Variables we’ve assigned here– as long as the assigned value is a valid path (preferrably, a valid path which points to the destination desired). However, if the reader wants to learn the value of %HOMEDRIVE%, or any such variable, simply launch the terminal (as described in the previous paragraph), and execute the following expression from the command line:echo %VARIABLE_NAME%
Assign value to the last of the Environment Variables covered here, %PAFCACHE%. As alluded, %PAFCACHE% will ideally represent a path on the System drive (vs the potentially slower data retrieval from the PAF drive itself) for any applicable PAF programs to more quickly interact with cache files.
Variable Name: PAFCACHE
Variable Value: %HOMEDRIVE%pafCache
( e.g. C:pafCache )
Retrospective
Now that you’ve assigned the several suggested variables listed above, consider the following statement about the deprecated variable name PAFROOT, and the suggested concepts of coverage and clean.
Can you imagine why?
AFTER ADDING NEW VARIABLES
The Environment Variables Have Been Set. What Next?
Verification:
Step 01:
Verify the system recognizes your new ENV VARs. Do the following:
START > RUN > cmd.exe (teminal window opens)
Type the following at the command line:
C:YOURPROMPT> echo %PAFDRIVE%
Scenario #1: If the terminal replies %PAFDRIVE%, restart the system.
When system is up and running, try STEP 01 again.
Scenario #2: If the terminal replies P: (the value entered in ENV)
Success! Now you’re ready to maintain multiple systems, using
the same PAF drive, and the same FreeCommander configuration
on each system, without concern for reconfiguring either setup.
Env Quick Summary
- PAFDRIVE = [PAF_Device_Volume_Letter]: (e.g. P: )
- PORTABLEAPPS = %PAFDRIVE%PortableApps
- PAFDOCS = %PAFDRIVE%Documents
- PAFAPPDATA = %PAFDRIVE%DocumentsApplication Data
- PAFCACHE = %HOMEDRIVE%pafCache
NOTE:
After entering each “New System Variable”, it should be visible in the
“System Variables” area of the “Environment Variables” window. However, any
Environment Variables created now WILL NOT be available for System use, UNTIL
the system is shutdown, and restarted (Click: “Start”, then “Turn Off
Computer”, and finally “Restart” from the shutdown menu options.)
©2010 WordPress Center .net, and J.S., Author
VIEW “About” AT http://WordpressCenter.net FOR MORE INFORMATION
PortableApps.com Format
PortableApps.com and PAF format are the property o
f PortableApps.com
This document, and the instructions and viewpoint of its text, is not
distributed, endorsed, or authorized by PortableApps.com.